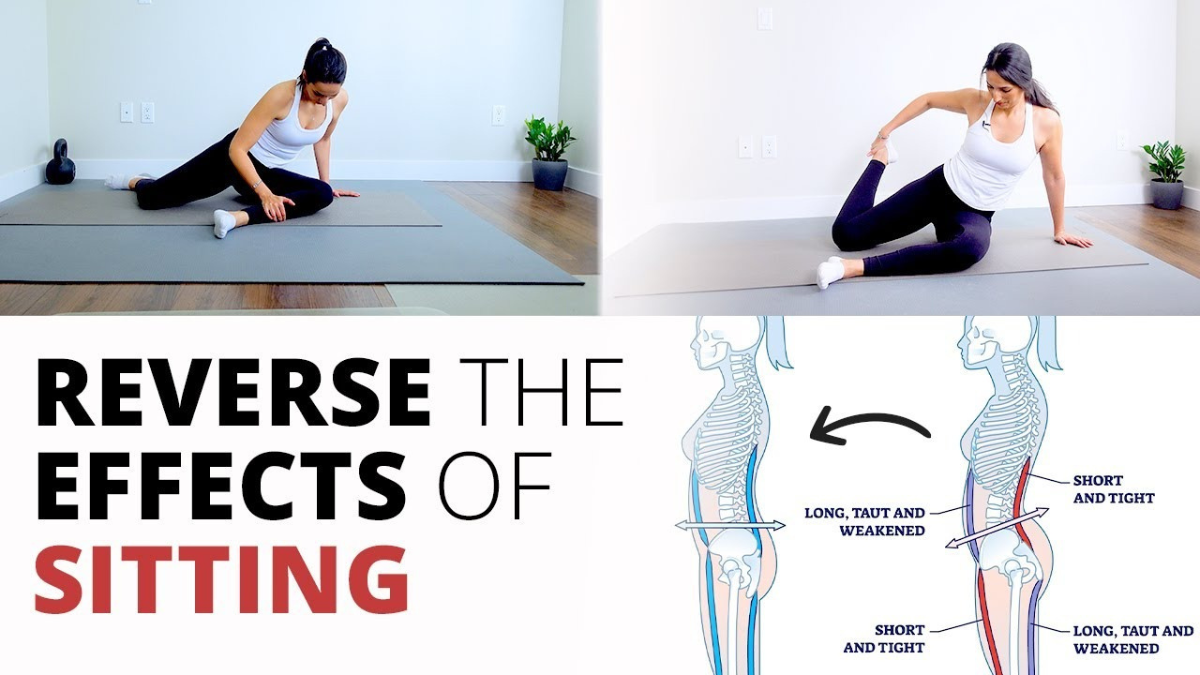
Modern life quietly shortens and stiffens the hips. Long hours of sitting at a desk, driving, scrolling on the couch, climbing stairs with poor posture, and even standing with weight shifted to one side can all contribute to hip tightness. Over time, the muscles surrounding the hips—especially the hip flexors, glutes, piriformis, inner thighs, and hamstrings—become imbalanced. This can lead to stiffness, lower back discomfort, reduced mobility, and even poor posture.
The good news is that yoga offers a gentle, effective, and sustainable way to “reverse” hip tightness caused by daily habits. While no stretch instantly undoes years of tension, consistent yoga practice can restore range of motion, improve circulation, release muscular holding patterns, and retrain the body to move more freely.

In this article, we’ll explore why hip tightness happens, how yoga helps, and the best yoga poses to relieve and reverse tight hips from daily life.
Why Daily Life Causes Hip Tightness
The hips are a complex joint system designed for movement in multiple directions. But daily routines often limit that movement.
Common causes of tight hips include:
- Sitting for long periods: This shortens the hip flexors and weakens the glutes.
- Poor posture: Slouching compresses the front of the hips and strains the lower back.
- Lack of movement variety: Repeating the same walking or sitting patterns reduces joint mobility.
- Stress and tension: Emotional stress can cause unconscious gripping in the hips and pelvic region.
- Weak stabilizing muscles: When glutes and core are underactive, the hip flexors and lower back overcompensate.
Tight hips don’t just affect the pelvis. They can contribute to:
- Lower back pain
- Knee strain
- Reduced stride length
- Poor balance
- Difficulty squatting or bending
- Postural fatigue
Yoga helps address these issues by combining stretching, strengthening, breath awareness, and mindful alignment.
How Yoga Helps Reverse Hip Tightness
Yoga is especially effective because it doesn’t just stretch one muscle at a time. It improves how the entire pelvic and lower-body system functions together.
Benefits of yoga for tight hips:
- Lengthens shortened hip flexors
- Releases deep glute and piriformis tension
- Improves internal and external hip rotation
- Opens the inner thighs and hamstrings
- Activates weak glutes and core muscles
- Enhances pelvic alignment
- Reduces compensatory tension in the lower back
For best results, hold poses slowly, breathe deeply, and avoid forcing flexibility. The goal is mobility with control, not extreme stretching.
10 Best Yoga Poses for Reversing Hip Tightness
1. Child’s Pose (Balasana)
Child’s Pose is a calming starting position that gently opens the hips, lower back, and thighs. A wide-knee variation especially helps release the groin and inner hips.
How to do it:
- Kneel on the mat.
- Bring your big toes together and widen your knees.
- Sit your hips back toward your heels.
- Fold your torso forward and extend your arms out in front.
- Rest your forehead on the mat.
Hold:
- 30–60 seconds
Benefits:
- Releases tension in the lower back
- Gently opens hips and groin
- Encourages deep diaphragmatic breathing
Tip: Place a pillow under the chest or forehead if needed.
2. Low Lunge (Anjaneyasana)
Low Lunge is one of the best poses for counteracting prolonged sitting because it deeply stretches the hip flexors—especially the psoas and rectus femoris.
How to do it:
- Start in a lunge with the right foot forward.
- Lower the left knee to the mat.
- Keep the front knee stacked over the ankle.
- Gently shift the hips forward while lifting the chest.
- Raise the arms overhead if comfortable.
Hold:
- 30–45 seconds each side
Benefits:
- Lengthens tight hip flexors
- Improves pelvic mobility
- Reduces lower back compression caused by sitting
Tip: Slightly tuck the pelvis (posterior tilt) to deepen the stretch safely.
3. Pigeon Pose (Eka Pada Rajakapotasana Prep)
Pigeon Pose targets the outer hips, glutes, and piriformis—areas that often become tight from sitting, walking imbalances, or stress.
How to do it:
- From all fours or Downward Dog, bring the right knee toward the right wrist.
- Angle the right shin comfortably in front of you.
- Extend the left leg straight back.
- Keep the hips as level as possible.
- Stay upright or fold forward.
Hold:
- 45–90 seconds each side
Benefits:
- Deeply opens glutes and outer hips
- Releases piriformis tension
- Can ease hip-related sciatic discomfort
Tip: Place a block or cushion under the front hip for support.
4. Butterfly Pose (Baddha Konasana)
Butterfly Pose is excellent for opening the inner thighs, groin, and hip joints while improving circulation in the pelvic area.
How to do it:
- Sit with your legs extended.
- Bend your knees and bring the soles of your feet together.
- Let your knees drop outward.
- Sit tall and hold your feet or ankles.
- Optionally hinge forward slightly from the hips.
Hold:
- 45–60 seconds
Benefits:
- Opens adductors and groin
- Encourages external hip rotation
- Helps relieve stiffness from sitting cross-legged improperly
Tip: Sit on a folded blanket if your lower back rounds.
5. Figure Four Pose (Reclined Thread the Needle)
This is a more accessible alternative to Pigeon Pose and is ideal for people with knee sensitivity or very tight hips.
How to do it:
- Lie on your back with knees bent.
- Cross the right ankle over the left thigh.
- Lift the left foot off the floor.
- Thread your hands behind the left thigh or shin.
- Gently draw the legs toward your chest.
Hold:
- 30–60 seconds each side
Benefits:
- Releases outer hips and glutes
- Safer for beginners than full Pigeon
- Can reduce tension that pulls on the lower back
Tip: Keep the head and shoulders relaxed on the floor.
6. Garland Pose (Malasana)
Garland Pose is a deep squat that restores natural hip mobility often lost through chair-sitting. It opens the hips, ankles, and lower spine.
How to do it:
- Stand with feet slightly wider than hip-width.
- Turn toes out slightly.
- Lower into a deep squat.
- Bring palms together at the chest.
- Press elbows gently into the inner knees.
Hold:
- 20–40 seconds
Benefits:
- Opens hips and groin
- Improves ankle and pelvic mobility
- Strengthens the feet and postural muscles
Tip: Sit on a yoga block if your heels lift or the squat feels unstable.
7. Lizard Pose (Utthan Pristhasana)
Lizard Pose is a powerful hip opener that targets the hip flexors, groin, and inner thighs all at once.
How to do it:
- Step the right foot outside the right hand from a lunge.
- Lower the back knee if needed.
- Keep hands on the floor or lower to forearms.
- Let the hips sink forward and down.
Hold:
- 30–45 seconds each side
Benefits:
- Deep stretch for the hip flexors and groin
- Improves mobility for squatting and lunging
- Helps unwind asymmetry between sides
Tip: Use blocks under your hands to reduce strain.
8. Happy Baby Pose (Ananda Balasana)
Happy Baby is a gentle but effective pose for opening the hips while decompressing the lower back.
How to do it:
- Lie on your back.
- Bend your knees toward your chest.
- Hold the outsides of your feet or ankles.
- Stack knees over ankles.
- Gently draw the knees toward the armpits.
Hold:
- 30–60 seconds
Benefits:
- Opens the inner hips and groin
- Releases the sacrum and lower back
- Encourages relaxed breathing
Tip: If reaching the feet is hard, hold the shins instead.
9. Frog Pose (Mandukasana Variation)
Frog Pose is an intense but highly effective stretch for tight inner thighs and deep hip restriction. Approach slowly and mindfully.
How to do it:
- Start on hands and knees.
- Widen the knees apart while keeping ankles in line with knees.
- Lower onto forearms if comfortable.
- Keep the spine neutral and avoid collapsing.
Hold:
- 20–45 seconds
Benefits:
- Deeply stretches the adductors
- Improves hip abduction
- Helps reverse stiffness from narrow sitting postures
Tip: Use blankets under the knees for comfort.
10. Bridge Pose (Setu Bandhasana)
Not all hip relief comes from stretching. Bridge Pose strengthens the glutes and posterior chain, which helps correct the muscular imbalances that cause hip tightness in the first place.
How to do it:
- Lie on your back with knees bent and feet hip-width apart.
- Press into your feet.
- Lift your hips toward the ceiling.
- Keep thighs parallel and chest open.
- Lower slowly with control.
Hold:
- 20–30 seconds, repeat 2–3 rounds
Benefits:
- Strengthens glutes and hamstrings
- Counteracts weak backside muscles from sitting
- Supports healthier pelvic alignment
Tip: Avoid flaring the ribs or turning the pose into a backbend.
A Simple 10–15 Minute Hip-Opening Yoga Routine
If you want a practical daily sequence, try this:
- Child’s Pose – 1 minute
- Low Lunge – 45 seconds each side
- Lizard Pose – 30 seconds each side
- Butterfly Pose – 1 minute
- Figure Four Pose – 45 seconds each side
- Pigeon Pose – 1 minute each side
- Happy Baby Pose – 45 seconds
- Bridge Pose – 3 rounds of 20 seconds
This routine can be done in the morning to “undo” stiffness or in the evening to release built-up tension from the day.
Tips to Get Better Results
To truly reverse hip tightness, consistency matters more than intensity.
Best practices:
- Practice 4–6 days per week, even if only for 10 minutes
- Use slow breathing to help muscles release
- Never push into sharp pain
- Support poses with blocks, blankets, or cushions
- Balance stretching with strengthening (especially glutes and core)
- Stand up and move every 30–60 minutes during long sitting periods
Remember: tightness often returns if daily habits don’t change. Yoga works best when paired with less sitting, better posture, and more movement breaks.
Common Mistakes to Avoid
When stretching tight hips, people often overdo it.
Avoid these errors:
- Forcing range of motion
- Ignoring knee discomfort in Pigeon or Butterfly
- Dumping into the lower back instead of targeting the hips
- Holding the breath during deep stretches
- Doing only passive stretching without strengthening
Gentle, regular practice is what creates lasting change.
Conclusion
Hip tightness is one of the most common side effects of modern living, but it doesn’t have to become your normal. The body is remarkably adaptable, and with consistent yoga practice, you can gradually reverse the stiffness created by hours of sitting, poor posture, and repetitive daily habits.
The most effective approach is a combination of hip-opening stretches, mindful breathing, and strength-building poses. Poses like Low Lunge, Pigeon, Figure Four, Butterfly, and Bridge work together to lengthen tight muscles, release deep tension, and restore healthier movement patterns.
You do not need an advanced practice or long routine to see results. Just 10–15 minutes a day can make a noticeable difference in how your hips feel, how your lower back moves, and how comfortably you walk, sit, and stand.
If you stay consistent, move mindfully, and listen to your body, yoga can become one of the best long-term tools for reclaiming hip mobility and reducing everyday discomfort.
FAQs
1. How often should I do yoga for tight hips?
For best results, practice at least 4–6 times per week. Even a short 10-minute routine done consistently is more effective than an intense session once a week.
2. Can yoga completely fix hip tightness from sitting?
Yoga can significantly improve and often reverse hip tightness, but results depend on consistency and lifestyle changes. If you continue sitting for long periods without breaks, tightness may return.
3. Which yoga pose is best for tight hips?
There is no single “best” pose, but Low Lunge is excellent for tight hip flexors from sitting, while Pigeon Pose and Figure Four Pose are especially effective for the outer hips and glutes.
4. Is it normal to feel discomfort in hip-opening poses?
Mild stretching sensation is normal, but sharp pain, pinching, or knee pain is not. Always modify the pose, use props, or choose a gentler variation.
5. Can tight hips cause lower back pain?
Yes. Tight hips can alter pelvic alignment and force the lower back to compensate, which often leads to stiffness, tension, or pain in the lumbar spine.
6. Should I stretch tight hips every day?
Yes, gentle daily stretching is usually safe and beneficial. Just avoid aggressive stretching and include strengthening poses like Bridge Pose to support long-term improvement.
7. What if I can’t do Pigeon Pose?
Use Reclined Figure Four (Thread the Needle) instead. It provides a similar outer-hip stretch with much less pressure on the knees.