


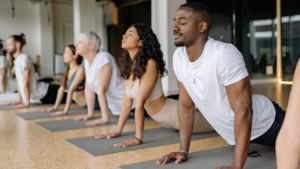
Sun Salutation A (Surya Namaskar A) is one of the most popular yoga flows for beginners. It is simple, energizing, and a wonderful way to connect breath with movement. Practiced for centuries in traditional yoga, this sequence is often used at the beginning of a yoga session to warm up the body, calm the mind, and build focus. For beginners, Sun Salutation A is an excellent introduction to foundational yoga poses because it teaches alignment, rhythm, and mindfulness in a manageable way.
Whether you are just starting your yoga journey or looking for a gentle daily movement routine, Sun Salutation A can become a powerful habit. In this article, we’ll explore what Sun Salutation A is, its benefits, the step-by-step sequence, beginner-friendly tips, common mistakes to avoid, and frequently asked questions.
What Is Sun Salutation A?

Sun Salutation A is a short flowing sequence of yoga poses traditionally practiced in a smooth rhythm with the breath. In Sanskrit, it is called Surya Namaskar A, where Surya means sun and Namaskar means salutation or bowing.
This sequence is often practiced in styles such as Vinyasa Yoga and Ashtanga Yoga. It is designed to gently awaken the body, increase circulation, and prepare you for deeper yoga practice. It includes forward folds, a plank variation, a gentle backbend, and a return to standing.
For beginners, Sun Salutation A offers a complete mini-practice because it stretches and strengthens multiple muscle groups while teaching the importance of synchronized breathing.
Benefits of Sun Salutation A for Beginners

Practicing Sun Salutation A regularly can offer both physical and mental benefits. Here are some of the most important ones:
1. Warms Up the Entire Body
The sequence activates the shoulders, spine, hamstrings, hips, core, and legs. It’s an ideal warm-up before other yoga poses or even before a busy day.
2. Improves Flexibility
As you move through forward folds, lunging transitions, and backbends, your muscles gradually become more flexible—especially the hamstrings, calves, chest, and spine.
3. Builds Strength
Although gentle, Sun Salutation A includes poses like Plank, Chaturanga modification, and Downward-Facing Dog, which strengthen the arms, shoulders, core, and legs.
4. Enhances Breath Awareness
Each movement is linked to an inhale or exhale. This teaches beginners how to breathe mindfully and use breath as an anchor for movement and focus.
5. Boosts Energy and Circulation
Because it is dynamic, the flow increases blood circulation and helps you feel more awake and refreshed. Many people practice it in the morning for this reason.
6. Reduces Stress
The combination of movement and breath can calm the nervous system, reduce mental clutter, and create a sense of balance and grounding.
7. Creates a Consistent Routine
For beginners, a short and simple sequence is easier to maintain daily. Even 5–10 minutes of Sun Salutation A can make a difference.
Sun Salutation A: Step-by-Step Basic Sequence
Below is the beginner-friendly version of Sun Salutation A. Move slowly and focus on the breath rather than speed.
1. Mountain Pose (Tadasana)
How to do it:
Stand tall at the front of your mat with your feet together or hip-width apart. Let your arms rest by your sides. Spread your toes and ground evenly through both feet.
Breath: Take a deep inhale and exhale here.
Beginner tip:
Keep a soft bend in the knees if standing with legs completely straight feels tense.
2. Upward Salute (Urdhva Hastasana)
How to do it:
Inhale and sweep your arms out to the sides and overhead. Reach upward through your fingertips. Lift your chest gently.
Breath: Inhale.
Beginner tip:
Avoid crunching the lower back. Keep your ribs gently drawn in and lengthen upward.
3. Standing Forward Fold (Uttanasana)
How to do it:
Exhale and hinge from your hips as you fold forward. Bring your hands toward the floor, shins, or blocks.
Breath: Exhale.
Beginner tip:
Bend your knees generously if your hamstrings feel tight. The goal is length in the spine, not forcing the legs straight.
4. Halfway Lift (Ardha Uttanasana)
How to do it:
Inhale and lift halfway up, placing your hands on your shins or fingertips on the mat. Lengthen your spine forward and broaden your chest.
Breath: Inhale.
Beginner tip:
Think of creating a flat back rather than lifting too high. Keep the neck long.
5. Plank Pose
How to do it:
Exhale and step back into Plank Pose. Shoulders stack over wrists, legs are strong, and the body forms a straight line from head to heels.
Breath: Exhale.
Beginner tip:
You can lower your knees to the mat for extra support.
6. Knees-Chest-Chin or Chaturanga Modification
How to do it:
From plank, beginners can lower the knees first, then slowly lower the chest and chin to the mat while keeping the hips slightly lifted. Alternatively, lower all the way down with control.
Breath: Exhale.
Beginner tip:
This modification is safer and more accessible than full Chaturanga for many beginners.
7. Cobra Pose (Bhujangasana)
How to do it:
Inhale and slide your chest forward into Cobra Pose. Keep elbows slightly bent and close to your body. Lift the chest using back strength rather than pushing too hard with the hands.
Breath: Inhale.
Beginner tip:
Keep your shoulders away from your ears and only lift as high as feels comfortable.
8. Downward-Facing Dog (Adho Mukha Svanasana)
How to do it:
Exhale and tuck your toes under. Lift your hips up and back into an inverted V-shape. Press your hands firmly into the mat and lengthen your spine.
Breath: Exhale and stay here for 3–5 deep breaths.
Beginner tip:
Bend your knees as much as needed. Focus on a long spine instead of forcing your heels to the floor.
9. Step or Walk Forward
How to do it:
At the end of your Downward Dog, look forward and step or walk your feet to the front of the mat.
Breath: Inhale as you move forward.
10. Halfway Lift (Ardha Uttanasana)
How to do it:
Inhale and lift halfway, lengthening the spine.
Breath: Inhale.
11. Standing Forward Fold (Uttanasana)
How to do it:
Exhale and fold back down.
Breath: Exhale.
12. Upward Salute (Urdhva Hastasana)
How to do it:
Inhale, press through your feet, rise all the way up, and sweep the arms overhead.
Breath: Inhale.
13. Return to Mountain Pose (Tadasana)
How to do it:
Exhale and bring your arms down to your sides, standing tall.
Breath: Exhale.
This completes one round of Sun Salutation A.
How Many Rounds Should Beginners Practice?
If you’re new to yoga, start with 2–4 rounds at a slow pace. This allows your body to learn the movements without strain. As your strength and confidence improve, you can gradually increase to 5–8 rounds.
The key is to prioritize quality over quantity. It is better to practice fewer rounds with good form and steady breathing than many rounds with tension or rushing.
Beginner Tips for Practicing Safely
1. Move Slowly
Sun Salutation A is often practiced quickly in advanced classes, but beginners should slow it down. Take your time learning the transitions.
2. Use Props
Yoga blocks under the hands in forward folds can make the sequence more comfortable and accessible.
3. Bend the Knees
Tight hamstrings are very common. A slight bend in the knees can protect the lower back and improve alignment.
4. Modify the Push-Up Portion
Instead of full Chaturanga, lower the knees first or come all the way to the belly with control.
5. Focus on Breath
Try not to hold your breath. If you lose the rhythm, pause in Mountain Pose and restart.
6. Listen to Your Body
Discomfort from stretching is different from pain. Stop immediately if you feel sharp pain, dizziness, or strain.
Common Mistakes Beginners Should Avoid
1. Rushing Through the Sequence
Moving too fast can cause poor alignment and make the practice feel stressful rather than grounding.
2. Forcing Flexibility
Trying to touch the floor with straight legs often leads to rounding the back. Bend the knees instead.
3. Collapsing in the Lower Back
In Upward Salute and Cobra, avoid over-arching the spine. Lengthen upward and engage the core gently.
4. Dumping Weight Into the Wrists
In Plank and Downward Dog, spread the fingers wide and press evenly through the hands to protect the wrists.
5. Holding the Breath
The breath is what transforms the poses into a flowing yoga practice. Keep it smooth and steady.
Best Time to Practice Sun Salutation A
Traditionally, Sun Salutations are practiced in the morning, facing the rising sun. Morning practice can energize the body and set a positive tone for the day. However, beginners can practice anytime that feels realistic and sustainable.
- Morning: Great for energy and consistency
- Afternoon: Helpful for relieving stiffness from sitting
- Evening: Best if practiced slowly and gently, rather than as a vigorous flow
Even 5 minutes daily can create noticeable benefits over time.
Who Should Be Cautious?
While Sun Salutation A is beginner-friendly, some people should practice with modifications or guidance:
- People with wrist pain or carpal tunnel
- Those with lower back issues
- Anyone recovering from shoulder injuries
- People with high blood pressure (especially with fast transitions)
- Pregnant practitioners (depending on trimester and comfort)
If you have a medical condition or injury, it’s wise to consult a healthcare professional or work with a qualified yoga teacher.
Conclusion
Sun Salutation A is one of the best yoga sequences for beginners because it is simple, effective, and deeply rewarding. It introduces essential yoga poses, teaches the connection between movement and breath, and provides a full-body warm-up in just a few minutes. Whether your goal is to improve flexibility, build strength, reduce stress, or create a healthy daily habit, this sequence offers a strong foundation.
The beauty of Sun Salutation A lies in its adaptability. You don’t need to be flexible, strong, or experienced to begin. You simply need a little space, a willingness to move, and patience with yourself. Start slowly, honor your body’s limits, and allow the practice to evolve naturally. Over time, this basic sequence can become a grounding ritual that supports both physical well-being and mental clarity.
FAQs
1. Is Sun Salutation A good for complete beginners?
Yes, Sun Salutation A is excellent for complete beginners. It introduces foundational yoga poses and helps you learn how to coordinate breath with movement. Beginners should move slowly and use modifications as needed.
2. How long does one round of Sun Salutation A take?
One slow beginner round usually takes 1–3 minutes, depending on how long you stay in Downward Dog and how slowly you transition between poses.
3. Can I do Sun Salutation A every day?
Yes, many people practice it daily. It is a great morning ritual and can be done in just a few minutes. Start with a few rounds and increase gradually based on your comfort level.
4. How many Sun Salutations should beginners do?
Beginners can start with 2–4 rounds and focus on proper form and breathing. As strength and endurance improve, you can increase to 5–8 rounds or more.
5. What if I can’t touch my toes in forward fold?
That’s completely normal. Bend your knees, place your hands on your shins, or use yoga blocks. Flexibility improves with consistent practice.
6. Is Sun Salutation A enough for a full workout?
It can be a short full-body movement practice, especially for beginners. However, for a more complete yoga session, you may want to combine it with standing poses, seated stretches, and relaxation.
7. What is the difference between Sun Salutation A and B?
Sun Salutation A is simpler and shorter, making it ideal for beginners. Sun Salutation B usually adds more challenging poses like Chair Pose and Warrior I, which increase strength and intensity.
8. Do I need to be flexible to practice Sun Salutation A?
No. Yoga helps build flexibility over time. You do not need to be flexible before you start.